Firebase支援「Email/密碼登入與註冊」以及多種OAuth登入方式,如Google,Twitter,Facebook等,本文說明如何使用Firebase「Email/密碼」認證API,設計會員Email註冊功能。除此之外,註冊表單則以Reactive Forms(FormBuilder)設計,並帶有輸入驗證功能,如下圖所示。
此App有註冊、HomePage兩個頁面。首頁設定為註冊頁面,註冊後,會在Cloud Firestore新增會員資料,並轉往HomePage;在HomePage按下登出又會回註冊頁面。完整程式碼在Github。製作重要步驟如下:
![]() |
有驗證功能的註冊表單。註冊與登出都是使用Firebase認證API |
Step 1:建立專案
除了前述註冊與HomePage兩個頁面,須另建立登入服務AuthService,處理Firebase Email/密碼註冊功能,以及登出:
ionic start RegisterExample blank --type=angular cd RegisterExample ionic g page register ionic g service services/auth而為了使用Firebase認證API,必須安裝firebase與@angular/fire兩個套件:
npm install firebase @angular/fireStep 1.1:加入Firebase連線設定
從Firebase控制台建立專案後,進入專案資料庫,建立Cloud Firestore資料庫:
接著先「以測試模式啟動」,方便後續測試。不過需注意畫面提醒訊息:測試模式,所有使用者都有存取權限。後續務必要自行設定安全性規則。
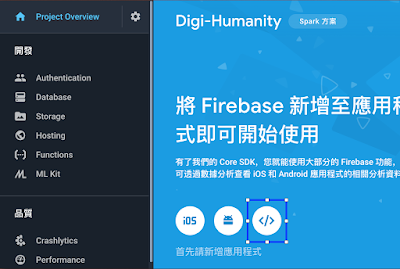
緊接著,在[Project Overview] 下,新增應用程式,點取「網路應用程式」符號(如下圖),以便取得Ionic App連線時所需參數設定值:
如上圖,複製反白區域的程式碼。
修改src/environments/environment.ts檔,將上述程式碼貼入其中,如下:
最後,修改app.module.ts,引入AngularFireModule模組與environment元件,同時設定AngularFireModule.initializeApp(),帶入Firebase連線所需參數:
![]() |
Cloud Firestore是Firebase新版的NoSQL文件資料庫 |
![]() |
以測試模式啟動Cloud Firestore,方便測試 |
![]() |
選取網路應用程式 |
![]() |
Ionic App所需連線參數 |
修改src/environments/environment.ts檔,將上述程式碼貼入其中,如下:
This file contains bidirectional Unicode text that may be interpreted or compiled differently than what appears below. To review, open the file in an editor that reveals hidden Unicode characters.
Learn more about bidirectional Unicode characters
export const environment = { | |
production: false, | |
firebaseConfig: { | |
apiKey: 'XXXXXXXXXXXXXXXXXXXXXXXXXXXXXXXXXXXXX', | |
authDomain: '專案id.firebaseapp.com', | |
databaseURL: 'https://專案id.firebaseio.com', | |
projectId: '專案id', | |
storageBucket: '專案id.appspot.com', | |
messagingSenderId: 'XXXXXXXXXXXX' | |
} | |
}; |
This file contains bidirectional Unicode text that may be interpreted or compiled differently than what appears below. To review, open the file in an editor that reveals hidden Unicode characters.
Learn more about bidirectional Unicode characters
//... | |
import { AngularFireModule } from '@angular/fire'; | |
import { environment } from '../environments/environment'; | |
//... | |
@NgModule({ | |
//... | |
imports: [ | |
AngularFireModule.initializeApp(environment.firebaseConfig), | |
// ... | |
], | |
// ... | |
}) | |
export class AppModule {} |
為了展示方便,將首頁改至"register",直接進入RegisterPage,如下之第3行:
This file contains bidirectional Unicode text that may be interpreted or compiled differently than what appears below. To review, open the file in an editor that reveals hidden Unicode characters.
Learn more about bidirectional Unicode characters
// ... | |
const routes: Routes = [ | |
{ path: '', redirectTo: 'register', pathMatch: 'full' }, | |
{ path: 'home', loadChildren: './home/home.module#HomePageModule' }, | |
{ path: 'register', loadChildren: './register/register.module#RegisterPageModule' }, | |
]; | |
// ... |
Step 2: 編修註冊頁面
Step 2.1: 修改register.module.ts,引入ReactiveFormsModule
但由於Ionic 4 CLI建立頁面時,會產生lazy loading頁面,每個頁面有自己的模組檔;因此,import ReactiveFormsModule是加在RegisterPage的模組檔-register.module.ts檔:
import { ReactiveFormsModule } from '@angular/forms';
而不是加在最上層的app.module.ts。
Step 2.2:製作註冊表單
Step 2.2:製作註冊表單
以FormGroup製作表單,使用Validators內建功能驗證欄位輸入,重點摘要如下:
This file contains bidirectional Unicode text that may be interpreted or compiled differently than what appears below. To review, open the file in an editor that reveals hidden Unicode characters.
Learn more about bidirectional Unicode characters
//... | |
import { Validators, FormBuilder, FormGroup, FormControl } from '@angular/forms'; | |
import { AuthService } from '../services/auth.service'; | |
//... | |
export class RegisterPage implements OnInit { | |
registerForm: any; | |
constructor( | |
private builder: FormBuilder, | |
private auth: AuthService | |
) { } | |
ngOnInit() { | |
this.buildForm(); | |
} | |
buildForm() { | |
this.registerForm = this.builder.group({ | |
email: ['', | |
[Validators.required, Validators.email] | |
], | |
displayName: ['', | |
[Validators.required, Validators.minLength(3), Validators.maxLength(32)] | |
], | |
passwordGroup: new FormGroup({ | |
password: new FormControl('', | |
[Validators.required, | |
Validators.pattern('^(?=.*[0-9])(?=.*[a-zA-Z])([a-zA-Z0-9]+)$'), | |
Validators.minLength(6), | |
Validators.maxLength(15)] | |
), | |
confirmPassword: new FormControl('', | |
[Validators.required] | |
) | |
}, { validators: PasswordValidator.MatchPassword }), | |
} | |
); | |
this.registerForm.valueChanges.subscribe(data => this.onValueChanged(data)); | |
// reset messages | |
this.onValueChanged(); | |
} | |
// Update validation messages of the form | |
private onValueChanged(data?: any) { | |
// ... | |
} | |
} |
- 第2行:引入FormBuilder等元件。
- 第18行:FormBuilder提供group()功能,可設定表單欄位。
- 第19-21行:每一欄位有其名稱,如19行之email;另外可訂定驗證規則。20行使用了必要欄位與email格式驗證(Validators.email)。22~24行則是訂定displayName欄位與其驗證規則。
- 第25-35行:密碼欄位比較特殊,除了第28行.pattern(),用regular expression定義密碼格式外,還有password, confirmPassword兩個欄位的比對需求。因此,第23行改用new FormGroup製作子群組,將password, confirmPassword歸入同群組,並在第35行設定此群組的驗證規則MatchPassword(位於src/app/_validators/password.validator.ts)。
- 第39行:訂閱valueChanges服務,監聽表單內容變動。一旦有所變動,則交由自訂函數onValueChange()進行判讀,並顯示錯誤訊息。
Step 2.3 加入密碼比對函式
密碼比對需使用@angular/forms的AbstractControl。透過AbstractControl定義的屬性,如value,可讓validator取得輸入欄位的值。新增src/app/_validators/password.validator.ts,並加入下列程式碼:
唯一要注意是:自訂validator當「比對失敗」時,要回傳true(如第8行),否則回傳null(第10行)。
Step 2.4 加入內容變動判讀onValueChange()
此處將所有輸入驗證的錯誤訊息定義於validatorMessages物件,另外formErrors則是列出各欄位與額外加上的validator,onValueChange()每次執行,都會依序檢視formErrors每一項目,看是否有錯誤訊息。部份程式碼如下:
最後,為了方便寫入user資料,另外定義了_model/user.ts,裡面定義了users集合內,各文件應該有的欄位。專案完整程式碼在Github,惟在git clone後,需改寫environment.ts裡關於Firebase的連線設定。
使用版本
firebase 5.5.3
@angular/fire 5.0.2
密碼比對需使用@angular/forms的AbstractControl。透過AbstractControl定義的屬性,如value,可讓validator取得輸入欄位的值。新增src/app/_validators/password.validator.ts,並加入下列程式碼:
This file contains bidirectional Unicode text that may be interpreted or compiled differently than what appears below. To review, open the file in an editor that reveals hidden Unicode characters.
Learn more about bidirectional Unicode characters
import { AbstractControl } from '@angular/forms'; | |
export class PasswordValidator { | |
static MatchPassword(ac: AbstractControl) { | |
let password = ac.get('password').value; | |
let confirmPassword = ac.get('confirmPassword').value ; | |
if( password != confirmPassword){ | |
return {matchPassword : true}; // 比對失敗 | |
} | |
return null; | |
} | |
} |
Step 2.4 加入內容變動判讀onValueChange()
此處將所有輸入驗證的錯誤訊息定義於validatorMessages物件,另外formErrors則是列出各欄位與額外加上的validator,onValueChange()每次執行,都會依序檢視formErrors每一項目,看是否有錯誤訊息。部份程式碼如下:
This file contains bidirectional Unicode text that may be interpreted or compiled differently than what appears below. To review, open the file in an editor that reveals hidden Unicode characters.
Learn more about bidirectional Unicode characters
formErrors = { | |
'email': '', | |
'displayName': '', | |
// ... | |
}; | |
validatorMessages = { | |
//... | |
'password': { | |
'required': '必填欄位', | |
'pattern': '至少須包含一字母一數字', | |
'minlength': '長度至少為6', | |
'maxlength': '長度最多為15' | |
}, | |
'confirmPassword': { | |
'required': '必填欄位', | |
}, | |
'matchPassword': '密碼不相符' | |
} | |
//... | |
private onValueChanged(data?: any) { | |
if (!this.registerForm) { return; } | |
const form = this.registerForm; | |
for (const field in this.formErrors) { | |
// clear previous error message (if any) | |
this.formErrors[field] = ''; | |
switch (field) { | |
case 'email': | |
case 'displayName': | |
//... | |
break; | |
case 'password': | |
case 'confirmPassword': | |
var group = form.get('passwordGroup'); | |
var control = group.get(field); | |
if (control && control.dirty && !control.valid) { | |
const messages = this.validatorMessages[field]; | |
for (const key in control.errors) { | |
this.formErrors[field] += messages[key] + ' '; | |
} | |
} | |
break; | |
case 'matchPassword': | |
var group = form.get('passwordGroup'); | |
if (group.get('password').dirty && group.get('confirmPassword').dirty | |
&& group.errors && group.errors.matchPassword) { | |
this.formErrors[field] = this.validatorMessages[field]; | |
} | |
break; | |
} | |
} | |
} |
- 第35-40行:一般預設的驗證都是如35行以dirty, not valid皆成立,確認輸入驗證失敗,此時便要顯示錯誤訊息。
- 第42-48行:密碼比對較為複雜,需透過上層的passwordGroup,才能取得其內的兩組密碼欄位,錯誤判斷規則如44-45所示。
Step 3 註冊連帶建立會員資料
services/auth.service.ts提供Firebase註冊服務,並在註冊時,一併建立會員資料。程式碼如下:
- 第21行:訂閱authState,如此一旦有登入或登出時,便會取得第22行user值(登入時為user資料,登出時為null)。因此如有登入,this.user便會填入current user(如24行)。
- 第32-38行:createUserWithEmailAndPassword()是Firebase註冊功能,會在Firebase後台建立一組email帳號(需6位以上)。但為了在Firestore資料庫產生相對應會員資料,35行呼叫自訂函式updateUserData()。
- 第40-44行:登出。透過Router轉向首頁。
- 第46-53行:userRef指向Cloud Firestore資料庫users集合內之文件;該文件的文件id:${user.uid}是在33行註冊時,系統產生的「使用者UID」,且已記錄於Firebase Authentication表格裡。如此使用者登入時,藉由UID便可取得users集合內對應到此user的文件。48-51設定表單傳送過來的user資料,52行將資料寫入Cloud Firestore。
This file contains bidirectional Unicode text that may be interpreted or compiled differently than what appears below. To review, open the file in an editor that reveals hidden Unicode characters.
Learn more about bidirectional Unicode characters
import { Injectable } from '@angular/core'; | |
import { AngularFireAuth } from '@angular/fire/auth'; | |
import { Router } from '@angular/router'; | |
import { AngularFirestore, AngularFirestoreDocument } from '@angular/fire/firestore'; | |
import { Observable, of } from 'rxjs'; | |
import { User } from '../../_models/user'; | |
import { switchMap } from 'rxjs/operators'; | |
@Injectable({ | |
providedIn: 'root' | |
}) | |
export class AuthService { | |
user: Observable<User>; | |
constructor( | |
private afAuth: AngularFireAuth, | |
private db: AngularFirestore, | |
private router: Router | |
) { | |
this.user = this.afAuth.authState.pipe( | |
switchMap(user => { | |
if(user) { | |
return this.db.doc<User>(`users/${user.uid}`).valueChanges(); | |
} else { | |
return of(null); | |
} | |
}) | |
); | |
} | |
signUp(user){ | |
return this.afAuth.auth.createUserWithEmailAndPassword(user.email,user.password) | |
.then(credential=>{ | |
this.updateUserData(credential.user, user.displayName); | |
}) | |
.catch(error=> console.log("註冊失敗:",error)); | |
} | |
signOut(){ | |
return this.afAuth.auth.signOut().then(()=>{ | |
this.router.navigate(['/']); | |
}); | |
} | |
private updateUserData(user, displayName){ | |
const userRef: AngularFirestoreDocument<User> = this.db.doc(`users/${user.uid}`) | |
const data:User = { | |
email: user.email, | |
displayName: displayName | |
} | |
return userRef.set(data); | |
} | |
} |
最後,為了方便寫入user資料,另外定義了_model/user.ts,裡面定義了users集合內,各文件應該有的欄位。專案完整程式碼在Github,惟在git clone後,需改寫environment.ts裡關於Firebase的連線設定。
使用版本
firebase 5.5.3
@angular/fire 5.0.2
沒有留言:
張貼留言